
Decorative Concrete Coating Acid Stained Concrete Overlay Lake Ozark Osage Beach Sunrise Beach MO
Okay, this week we’re at a home in climax, pray in Lake of the Ozarks I’ve got a screened-in porch here. What I’m doing in here is I’ve already ground down the majority of it. I have to take off the top layer.
You can kind of see where I’ve stopped here, and this little bit right here is what I have left to grind down, but it all it all looked like that. So I ‘ Ve got the majority of this ground down and we’re, trying to get it ready for the overlay this week and then out here we have the main part of the job.
I have a lot of cracks here to repair. Still, as you can see, we’re gonna go ahead and get those fixed up and they just kind of continue. This is probably the worst of it on this side, a little bit of stain going on here, get that all cleaned up pressure washed after I repair these cracks myself ears, pretty good.
It’s, a brand new slab. Here I don’t know how old it is, but it’s. Not very old. Just need some cleaning. This job in Lake of the Ozarks climax Springs. Missouri is now complete, but another coat of sealer on the Hamilton job.
This coat is our shine coat. It just really really brings the color of the acid stain it’s on this concrete out gives it a super. Nice shine just makes that color pop you you. This is inside the screened-in area.
Take your rum side over here get inside here. This is pretty fresh, so just gives us a little bit different view, so much shine on the other side and that wraps up this job climax Springs Lake of the Ozarks Missouri you
We started this Project with Concrete that was about 20 years of age, it had several cracks and some stained area’s, part of the concrete was just added within the last year, so the colors of the two slabs of concrete was way different, my client wanted to have the cracks repaired and make the New and Old concrete colors blend together and look as one single slab, and that’s exactly what we did.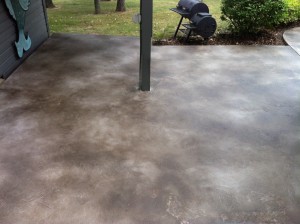
Our First task was to do some grinding, open the cracks up and get them repaired, after that we had to get the concrete prepped and ready for a Brand New Overlay with some Acid Staining. The Base coats went down great and the two large slabs of concrete now looked like they were the same color, the texture was a rock trowel, once the texture was on we put plastic on the home and the screened in patio area.
Next step was to Acid Stain the entire surface to pull it all together and marbleize the surface, we used a Chocolate and a Charcoal Colorant to add into our Antiquing Stains, so we were looking for a taupe color, once we had the color blend we were looking for we started the Acid Staining Process.
The Final step was to Lock it all in with a Quality Sealer and make the concrete look new and revived, I believe we saved the home owner from having to tear out and re-place the entire slab of Old Concrete which would have cost about 20k, needless to say they were very happy, please enjoy the pictures located here I will have a Video up very soon.
Call me for a FREE Estimate.
OR – You can Fill out this Convenient Contact form located HERE and I will Contact YOU!!
Thank you for Visiting my Website, come back again soon….
Rick LaFata
(573)-216-0930
rick@customconcretedesign.info
Custom Concrete Design
Tagged with: Acid Stain • Acid Staining • Camdenton MO • Chemical Resistant Coatings • Columbia MO • Commercial Flooring • Concrete Coating • Concrete Coatings • Concrete Contractor • Concrete Finishes • Concrete Floor • Concrete Floor Coating • Concrete Flooring • Concrete Flooring Lake Ozark • Concrete Floors • Concrete Overlays • Concrete Refinishes • Concrete Repair • Concrete Restoration • Concrete Resurfacing • Condo concrete coating • Custom Concrete Design • Custom Flooring • Decorative Concrete • Decorative Concrete Coating • Decorative Concrete Floor • Decorative Concrete Flooring • Decorative Concrete Flooring Lake Ozark Osage Beach MO • Decorative Concrete Overlay • Decorative Concrete Resurfacing • Driveway Concrete Acid Staining Overlay Lake Ozark MO • Driveway Concrete Coating Lake Ozark MO • Eldon MO • Epoxy Coating • Epoxy Floor Coating • Epoxy Flooring • Epoxy Garage Concrete Floors Lake Ozark Stamped Acid Stained Coating Osage Beach MO Painted Floor • Epoxy Garage Floor • Epoxy Garage Lake Ozark • Epoxy Garage Sunrise Beach MO • Faux Finish Tile Concrete • Floor Coating • Flooring Contractor • Flooring Ideas • Garage Floor • how to acid stain concrete driveway • how to paint concrete floors to look like stone • Jefferson City MO • Lake Ozark • Lake Ozark Concrete • Lake Ozark Concrete Floor • Lake Ozark Flooring Contractors • Lake Ozark Flooring Installer • Marble Flooring • Mystic Bay Osage Beach MO • Osage Beach Concrete Floor • Osage Beach Flooring • Painted Concrete • pictures of stained concrete floors with metallic acid • Pool Deck Lake Ozark MO • Porta Cima Garage Floor Sunrise Beach MO • Protective coating company • Protective Coatings • Residential Flooring • Stamped Concrete • Sunrise Beach MO • Tile Flooring • Walkway Lake Ozark Osage Beach MO • Wood Flooring
Filed under: Acid Stained Concrete Floors • Decorative Concrete Flooring • Epoxy Garage Floor • Stamped Concrete
Like this post? Subscribe to my RSS feed and get loads more!
