google.com, pub-1613111081024165, DIRECT, f08c47fec0942fa0

Faux Finish Archives

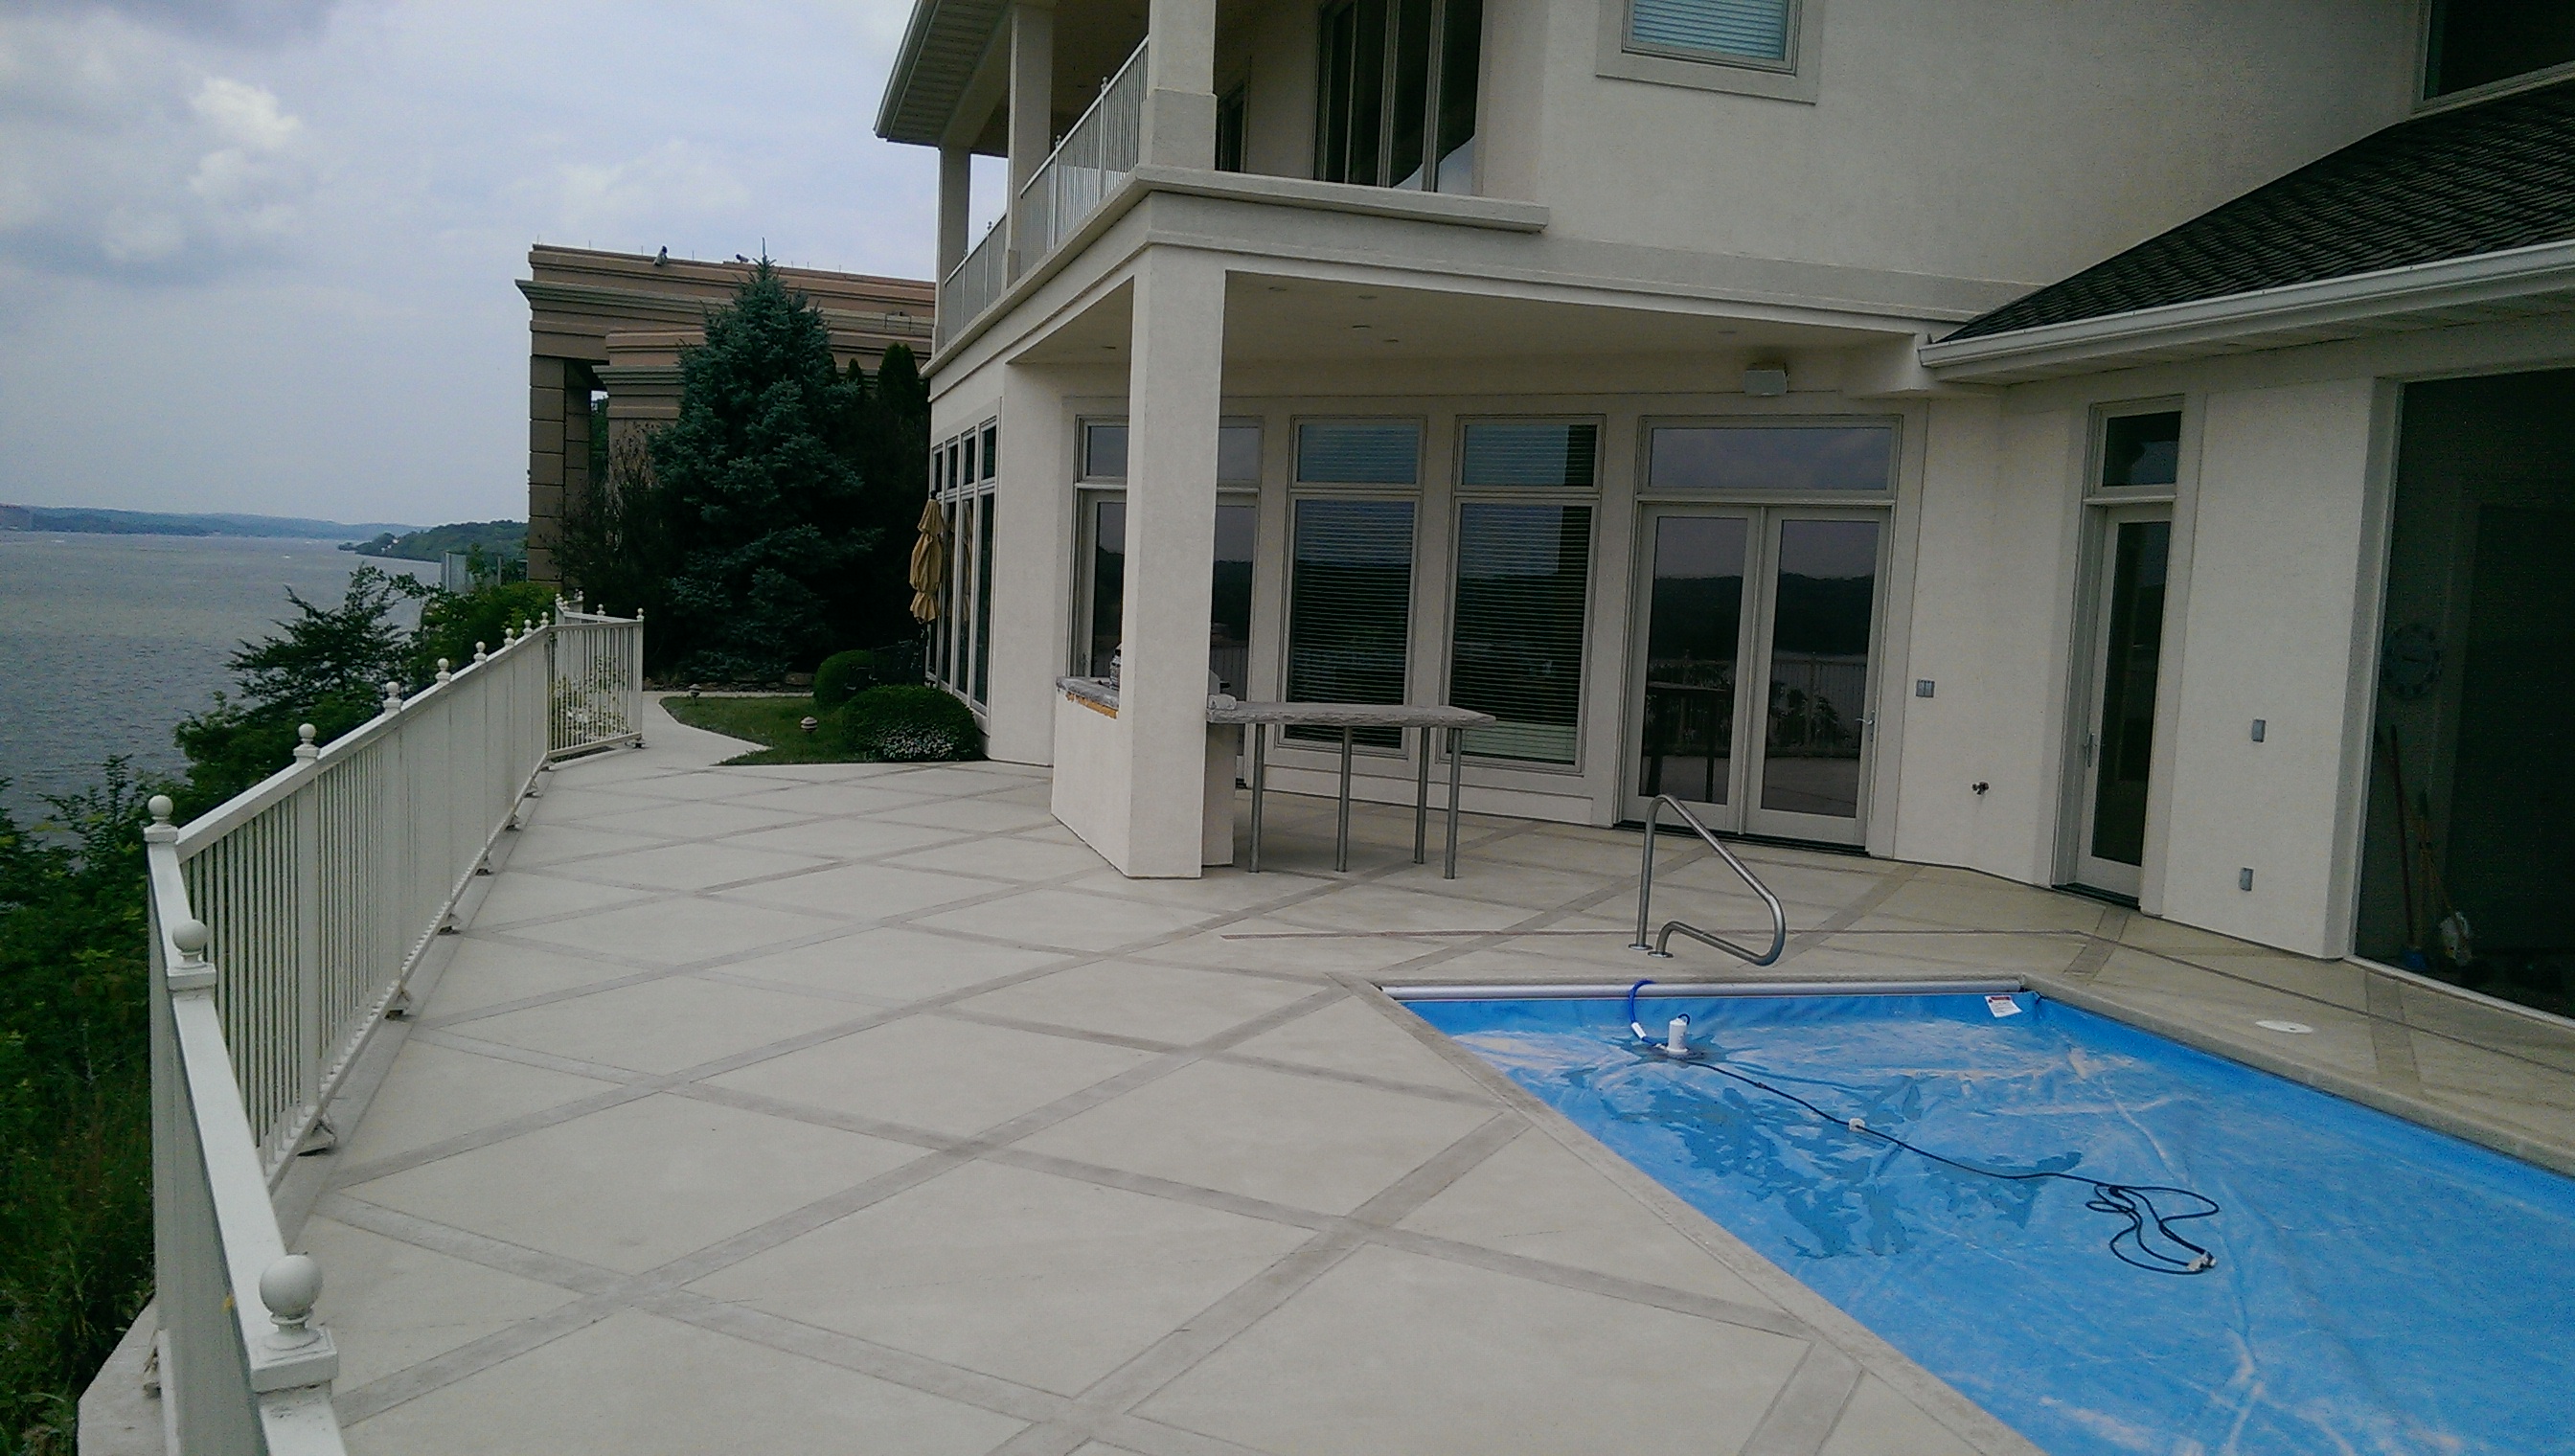
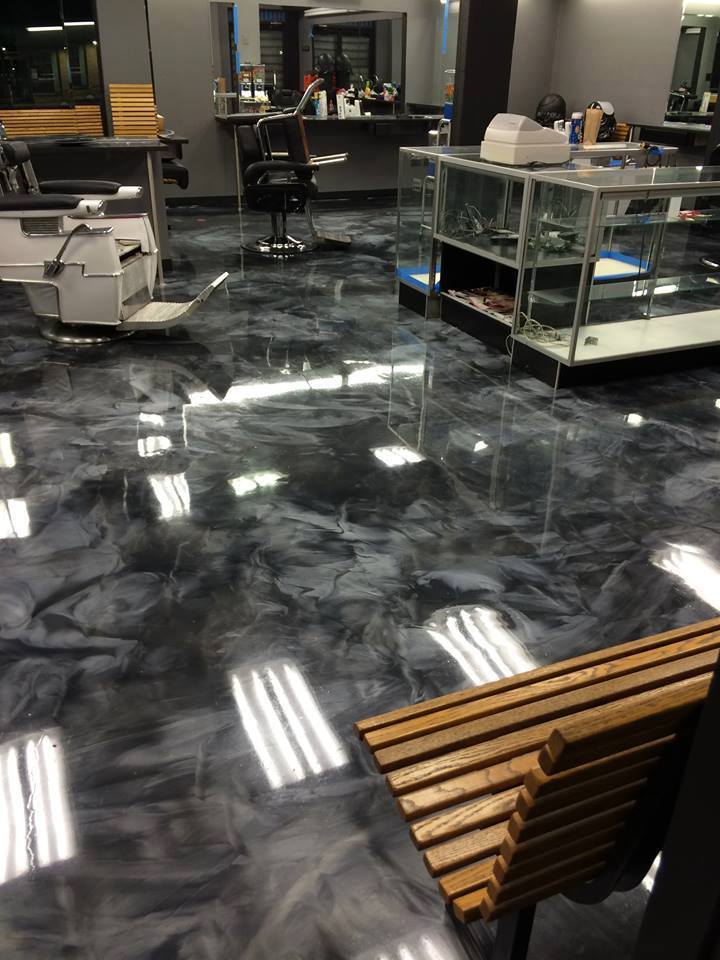
Just added a NEW Before and After Page!!

Hey Everybody its Rick Here….

Just wanted to Let everyone know that I have added a NEW PAGE!!

At the very Top of the Website page look in the Red Tabs for Before and After Photo’s
these are just a few recent pics I put together I have many more I’m just trying to find the time
to put them all together and get them into a folder to add to that NEW Before and After Page.


I actually have like hundred’s maybe thousands of pictures I will be uploading over the coming months,  
please stay with me as I add these.

Now for those that WANT to Get Subscribed to this Website Please hit that Subscribe button at bottom right of the banner it should read Subscribe Via Email RSS feed, IF YOU DO THAT you will get notified when I make any changes to this website, including adding these Before and After Photo’s to that page.

ANOTHER way to Subscribe is to receive the Push Notifications when the Website prompts you to get Notifications at the top Center of the Website, it asks:

“This Site Would Like To Send You Push Notifications” 

IF YOU WANT to hit YES, please do so, and you WILL be Notified when I add any content.

For those that are not familiar with a Push Notification, its basically the same kind of notifications you get on your Computer or Cell Phone from say Facebook or if you get an email or text to your cell phone… I can send you those Push Notifications, BUT…Not if you don’t get subscribed, so please get subscribed so you won’t miss out on all the cool projects I create in the future…. besides why wouldn’t you get Subscribed… its FREE!! 🙂

Hope you Enjoy the pictures and Video
MORE pictures located HERE!!

Call me for a FREE Estimate.

OR – You can Fill out this Convenient Contact form located HERE and I will Contact YOU!!

Thank you for Visiting My Website, come back again soon….

Rick LaFata
(573)-216-0930
rick@customconcretedesign.info
Custom Concrete Design


Decorative Concrete Overlay Coating Knockdown Finish on a Pool Deck | Lake Ozark, MO

On this pool decks we started our day by trimming back bushes grinding the walkway and grinding off the concrete overlay on the pool deck.

Once the concrete overlay was completely removed from the pool deck itself we had several cracks that needed repaired so we ground them out and filled them in. We also had one area that was a hole the size of a baseball so we cleaned it out and continued with our repair.

All the grinding and repairs were done we were finally ready to start our overlay on the entire surface started at the far end of the pool and just worked our way back with our base coat, once it was dry we came back through with a second base coat.

Now we have a fresh clean repaired concrete surface to work with, we measured everything out 4 x 4 squares set on a 45° pitch with a 5 inch border around each square and around the pool itself and we measured out a 10 inch border for the outside perimeter of the pool deck, once we had all our measurements done and had our marks down we continued with our fiber tape to lay down the pattern.

Once the pattern was down it was time for more colored concrete, I decided to do the all the borders first so that meant we had to paper off the 4 x 4 squares from any concrete overspray. Now the borders are sprayed and the only thing we could do was let everything dry overnight.

The next step was to paper off the borders so that we could spray the 4 x 4 squares the lighter color of the two colors, basically what we were trying to go for here and you can see from the pictures and the video is keeping everything overall very light with the color of the house and keeping the borders a few shades darker to set off our pattern and to also complement the trim of the house. After the squares were sprayed we pulled the paper off of our borders and then we also removed our fiber tape that separated the square and the border all of this reveals our pattern our colors and now it’s a matter of getting everything cleaned up and getting it sealed.

The whole process from start to finish took us about three weeks to complete, the reason it took a little bit longer on this project is simply because we had a lot of rain mother nature can be relentless sometimes, but the job got done it turned out great our client was very happy.

Hope you Enjoy the pictures and Video
MORE pictures located HERE!!

Call me for a FREE Estimate.

OR – You can Fill out this Convenient Contact form located HERE and I will Contact YOU!!

Thank you for Visiting my Website, come back again soon….

Rick LaFata
(573)-216-0930
rick@customconcretedesign.info
Custom Concrete Design


Knockdown Texture Upper Deck Condo | Lake of the Ozarks, MO

This week we’re at a condo complex in Greenview Missouri, this is an upper suspended deck with a gorgeous view, the homeowner wanted to do a solid seamless knockdown finish in a chocolate color.

We begin our work morning like we do most every job we grind the surface with our walk behind and hand grinders open up any cracks and repair, and then grind the repairs flush. Once the surface has been thoroughly profiled we get it all cleaned up and ready for concrete.IMAG3685

The next step of the process is to lay out a base coat of colored concrete once that’s down we add a second coat, that’s pretty much all we did the first two days.

Our third day we came in and prepped all of the walls, glass, and railing… Set up our mixing station and sprayed our concrete with our hopper gun, then knocked it down with our trowel…. Simple process.

Today we came back pulled down all the paper knocked down all the concrete burrs, cleaned it up real well and put on two coats of our premium sealer.

Overall this is a very simple process and does not take us very long.

Hope you Enjoy the pictures and Video
MORE pictures located HERE!!

Call me for a FREE Estimate.

OR – You can Fill out this Convenient Contact form located HERE and I will Contact YOU!!

Thank you for Visiting my Website, come back again soon….

Rick LaFata
(573)-216-0930
rick@customconcretedesign.info
Custom Concrete Design


Decorative Concrete Tuscan Slate Antiqued Charcoal Grey Linn Creek | Lake Ozark MO

We had some great concrete to work with on this particular project, the home was only about three years old and the concrete was in almost perfect condition there was one large crack that ran from one side of the slab to the other side on the lower outside patio/deck other than that the concrete was awesome to work with and so were the people!

The total square footage on this project was approximately 500sqft, the finish is Tuscan slate the coloring is a charcoal antique stain.IMAG1845

The prep work consisted of grinding out the loose material in the crack on the back patio deck, once we had it opened and cleaned we poured our material inside of the crack overflowing it letting it cure and grinding it down flush. There was some grinding here and there on the slab the walkway and the front stoop but it was very minimal, our next step was to mix up the muriatic acid and ammonia in separate buckets then put on our muriatic acid first followed by our ammonia and water mix once this was thoroughly scrubbed in we hooked up a pressure washer and pressure washed everything clean.

Once the prep work was out-of-the-way, we set up our workstation and proceeded to mix our first bucket of concrete, next step we applied our base coat of colored concrete, once the base coat was applied on all surfaces we continued to mix our concrete only a little bit lighter for the texture coat which is our Tuscan slate, once the first surface was dry we continued to apply our texture coat on top of the base coat on all surfaces.

The next day we came back prepped all the walls with paper or anything we didn’t want the antique stain to color, from there I mixed up enough antique stain to do the entire job once mixed we sprayed it down, sometimes you don’t always get it right the first time so we had to spray a second coat on (to darken more) until I got the look that I wanted once that was on all we could do was let it dry, we came back the next day and we put two coats of our premium CSS sealer on it.

Wrapped up a pretty simple job, but it turned out great… The homeowners were happy and so was I.

Hope you Enjoy the pictures and Video
MORE pictures located HERE!!

Call me for a FREE Estimate.

OR – You can Fill out this Convenient Contact form located HERE and I will Contact YOU!!

Thank you for Visiting my Website, come back again soon….

Rick LaFata
(573)-216-0930
rick@customconcretedesign.info
Custom Concrete Design


What Affects Cost of Decorative Concrete Floors??

I get Asked this Question more than any, can you ballpark a cost….understandable, but there are a number of factors that can substantially increase or reduce the installation cost of a decorative concrete floor. Some you can control, such as the complexity of the project, and others you can’t, such as the floor size and existing condition. Here are the issues that can have the biggest impact on what you’ll pay:

10277711_631674570276534_7726476077663520749_n

Size of the Floor – Typically, the larger the floor area, the lower the cost per square foot for installation due to the economies of scale. A small residential floor project, for example, is likely to cost more per square foot than a large 50,000-square-foot commercial floor.

Material Requirements – Using multiple colors of stain or dye on your floor or a specialty epoxy or metallic coating will not only increase your material costs, but also the labor costs for installation.

Design Complexity – The more complex your project, the greater the costs for both materials and labor. Customizations such as embedded objects, decorative sawcuts, stenciled designs, and the installation of metal divider strips may increase the total floor cost substantially. (But the results will look amazing!)

Current Condition of the Floor – Existing concrete floors that require a lot of patching or surface preparation will boost your total installation cost because these flaws will need to be repaired before the final decorative finish can be applied. Extensive surface preparation, such as grinding, crack repair, and spall repair, can add as much as $2 per square foot to the overall cost of the floor. If a full resurfacing is needed, expect to tack on another $2 to $3 per square foot (for a $4 to $5 per square foot increase).

Floors on Grade vs. Above-Grade InstallationsDecorative concrete floors installed on raised decks or subfloors will need a cement underlayment installed before the finished floor can be applied. Typically installers put down a series of products including waterproofing, metal lathe, a concrete overlay and then the final finishing and sealing coats. These applications can add another $2 to $3 per square foot to the cost of the floor.

Moisture-Vapor Transmission – Some floors have a high level of moisture-vapor transmission that will need to be remedied before most decorative coatings, overlays or sealers can be applied. This is usually not an issue with stained or polished concrete floors, although it can affect the color.

Hope you Enjoy the pictures and Video
MORE pictures located HERE!!

Call me for a FREE Estimate.

OR – You can Fill out this Convenient Contact form located HERE and I will Contact YOU!!

Thank you for Visiting my Website, come back again soon….

Rick LaFata
(573)-216-0930
rick@customconcretedesign.info
Custom Concrete Design

Facebook YouTube Twitter pinterest WordPress Flickr about.me Instagram

 Page 3 of 4 « 1  2  3  4 »