
Bathroom Concrete Floor Makeover in Lake Ozark, MO
This week we are remodeling a Bathroom Floor, upper level.
We came in pulled the lanolin up and laid down some roofing paper, then cut wire lath to fit over the roofing paper and stapled them both down to the wood sub floor about ever inch we placed a staple, so we went through alot of staples even know the bathroom was small. 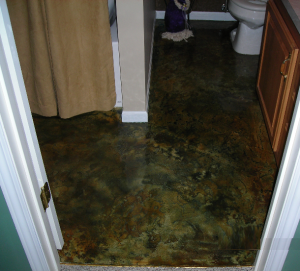
Next we started placing our build-able concrete material in place to cover the wire lath so we would have a solid slab of concrete to work with, once it was established after a few coats a thick 1/4 inch bottom then a skim coat over that, we were ready for some concrete texture, we did a chunky rock texture, we were going for a rustic old world kind of look st that texture really fit the bill.
Now that the texture was done it was time to prep the walls for the Acid Stain and the Antique Stain, we sprayed our Acid Stains first, diluting with water as we sprayed some, once both colors were dry we had to remove any residue left over from the acid before using our Antique Stains. We sprayed out our Antique stains and let them dry. Next was sealer, we wanted a high gloss so it was decided that a High Gloss Epoxy was the way to go, once the Epoxy was on we used a great wax to protect it and keep it scratch free.
Hope you Enjoy the pictures and Video
MORE pictures located HERE!!
Call me for a FREE Estimate.
OR – You can Fill out this Convenient Contact form located HERE and I will Contact YOU!!
Thank you for Visiting my Website, come back again soon….
Rick LaFata
(573)-216-0930
rick@customconcretedesign.info
Custom Concrete Design
![]()
![]()
![]()
![]()
![]()
![]()
![]()
![]()
Tagged with: Acid Stain • Acid Staining • Acid Staining Concrete Floors Porto Cima • Chemical Resistant Coatings • Columbia • Commercial Flooring • Concrete Coating • Concrete Coatings • Concrete Contractor • Concrete Finishes • Concrete Floor • Concrete Floor Coating • Concrete Flooring • Concrete Flooring Lake Ozark • Concrete Floors • Concrete Overlays • Concrete Protector Sealer • Concrete Refinishes • Concrete Repair • Concrete Restoration • Concrete Resurfacing • Custom Concrete Design • Custom Flooring • Decorative Concrete • Decorative Concrete Coating • Decorative Concrete Floor • Decorative Concrete Flooring • Decorative Concrete Overlay • Decorative Concrete Resurfacing • Epoxy Coating • Epoxy Floor Coating • Epoxy Flooring • Epoxy Garage Floor • Floor Coating • Flooring Contractor • Flooring Ideas • Garage Floor • Jefferson City MO Acid Staining Concrete Floors • Lake Ozark Concrete • Lake Ozark Concrete Floor • Lake Ozark Flooring Contractors • Lake Ozark Flooring Installer • Marble Flooring • Missouri • MO • MO Acid Staining Concrete Floors • Osage Beach Concrete Floor • Osage Beach Flooring • Painted Concrete • Protective coating company • Protective Coatings • Residential Flooring • Stamped Concrete Sunrise Beach • Sunrise Beach • Tile Flooring • Wood Flooring
Filed under: Acid Stained Concrete Floors • Decorative Concrete Flooring • Epoxy Garage Floor
Like this post? Subscribe to my RSS feed and get loads more!
