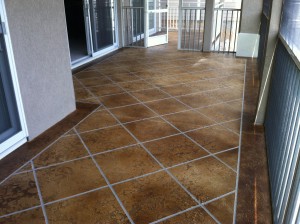
Decorative Concrete Condo Deck Osage Beach MO Acid Stained Faux Tile Flooring Lake Ozark MO
Here We Have a Project at Mystic Bay Condo’s in Osage Beach, Missouri.
My Blank Canvas of Concrete is Approximately 450sqft, we started by removing the railing, so we could grind some of the rough spots off of the surface, I call them concrete boogers or speed-bumps…lol.
The next step was to repair some of the cracks that were noticeable, some were hairline cracks, some needed to be opened up to remove all the lose particles of concrete that were floating around within the crack. Once opened up I mixed up the Epoxy with some silica sand and laid it in the cracks. I came Back the Next day and did some slight grinding over where the cracks were.
Then proceeded with our Decorative Concrete we lay out 2 base coats of Portland Cement with a Charcoal Colorant added in to the mix. This is my Grout Coat color you see.
Next step was to mark out my pattern of a 20×20 tile pattern on a 45 degree pitch, but first needed to establish my boarder of 10 inches all around the perimeter of the slab, once done I began to tape it all out with Strapping Tape.
Next came the Prepping of the walls so they don’t get spayed by the and the Tack Coat which I say in the Video (and Acid Stains), what that means is I simply mixed another bag of concrete with the same portion of colorant in it as the previous base coats, hooked up my compressor and hopper gun and sprayed the concrete on over the Strapping Tape, this is necessary for what we call in the industry as ‘Locking in the Grout Color’ to prevent any ‘BLEED UNDER” the tape from the 2 different colored Top coats and Acid stains going on to our Concrete Overlay in the next steps to come.
Next I mixed another bag of our Portland Cement with A color Called Palomino, this was squeegeed this on top of the Charcoal Gray Color (tack coat), once dry I mixed up more of the same color and then added my texturing, I continued to layer my coats with My Trowel until I had the look I wanted.
Next was to mix up the Acid Stains (Chemstone Acid Brown), once mixed I sprayed in a circular motion with a little water at first then the Acid went on over the water, this is to prevent any drops from the sprayer and it makes the acid feather out naturally on its on, this way it marbleizes much better.
Once Dry I pulled the Concrete Strapping Tape up to reveal my Pattern and the 2 Base Coats of Charcoal Grey, cleaned it all up real well, then I mixed up my sealers, and Locked it all down, here is where the coloring just pops up and says HELLO!!
I hope you Enjoyed the Video, the Pictures and the brief description of the process.
For a FREE Consultation and Estimate, use the Contact Form Located here
Thank You for Visiting my Site
Rick LaFata
(573)-216-0930
rick@customconcretedesign.info
Custom Concrete Design
Tagged with: Acid Stain • Acid Staining • Camdenton MO • Chemical Resistant Coatings • Columbia MO • Commercial Flooring • Concrete Coating • Concrete Coatings • Concrete Contractor • Concrete Finishes • Concrete Floor • Concrete Floor Coating • Concrete Flooring • Concrete Flooring Lake Ozark • Concrete Floors • Concrete Overlays • Concrete Refinishes • Concrete Repair • Concrete Restoration • Concrete Resurfacing • Condo concrete coating • Custom Concrete Design • Custom Flooring • Decorative Concrete • Decorative Concrete Coating • Decorative Concrete Floor • Decorative Concrete Flooring • Decorative Concrete Flooring Lake Ozark Osage Beach MO • Decorative Concrete Overlay • Decorative Concrete Resurfacing • Driveway Concrete Acid Staining Overlay Lake Ozark MO • Driveway Concrete Coating Lake Ozark MO • Eldon MO • Epoxy Coating • Epoxy Floor Coating • Epoxy Flooring • Epoxy Garage Floor • Epoxy Garage Lake Ozark • Epoxy Garage Sunrise Beach MO • Faux Finish Tile Concrete • Floor Coating • Flooring Contractor • Flooring Ideas • Garage Floor • Jefferson City MO • Lake Ozark • Lake Ozark Concrete • Lake Ozark Concrete Floor • Lake Ozark Flooring Contractors • Lake Ozark Flooring Installer • Marble Flooring • Mystic Bay Osage Beach MO • Osage Beach Concrete Floor • Osage Beach Flooring • Painted Concrete • Pool Deck Lake Ozark MO • Porta Cima Garage Floor Sunrise Beach MO • Protective coating company • Protective Coatings • Residential Flooring • Stamped Concrete • Sunrise Beach MO • Tile Flooring • Walkway Lake Ozark Osage Beach MO • Wood Flooring
Filed under: Acid Stained Concrete Floors • Decorative Concrete Flooring • Epoxy Garage Floor
Like this post? Subscribe to my RSS feed and get loads more!

