google.com, pub-1613111081024165, DIRECT, f08c47fec0942fa0

Acid Stained Concrete Painted Deck Patio Coating Osage Beach Lake Ozark Porto Cima Jefferson City

Started this Project with a good slab of concrete, it had some imperfections, like a few cracks we repaired, some light grinding, and it was a little wavey here and there, but overall it was in good shape.

I started by addressing the cracks in the slab by opening up the cracks with my v-blade attached to my hand held 4 inch grinder, cleaned the crack out real well and repaired it.

More info below the Video….


I came back in ground down some of the extra repair material, pressured washed, acid etched, ammonia rinsed and then pressure washed again, this concrete was repaired and thoroughly cleaned!

The next Step was to start the overlay process, I began by laying out the first grout coat color, followed by the second grout coat color, we went with a medium tone Chocolate color for the grout.

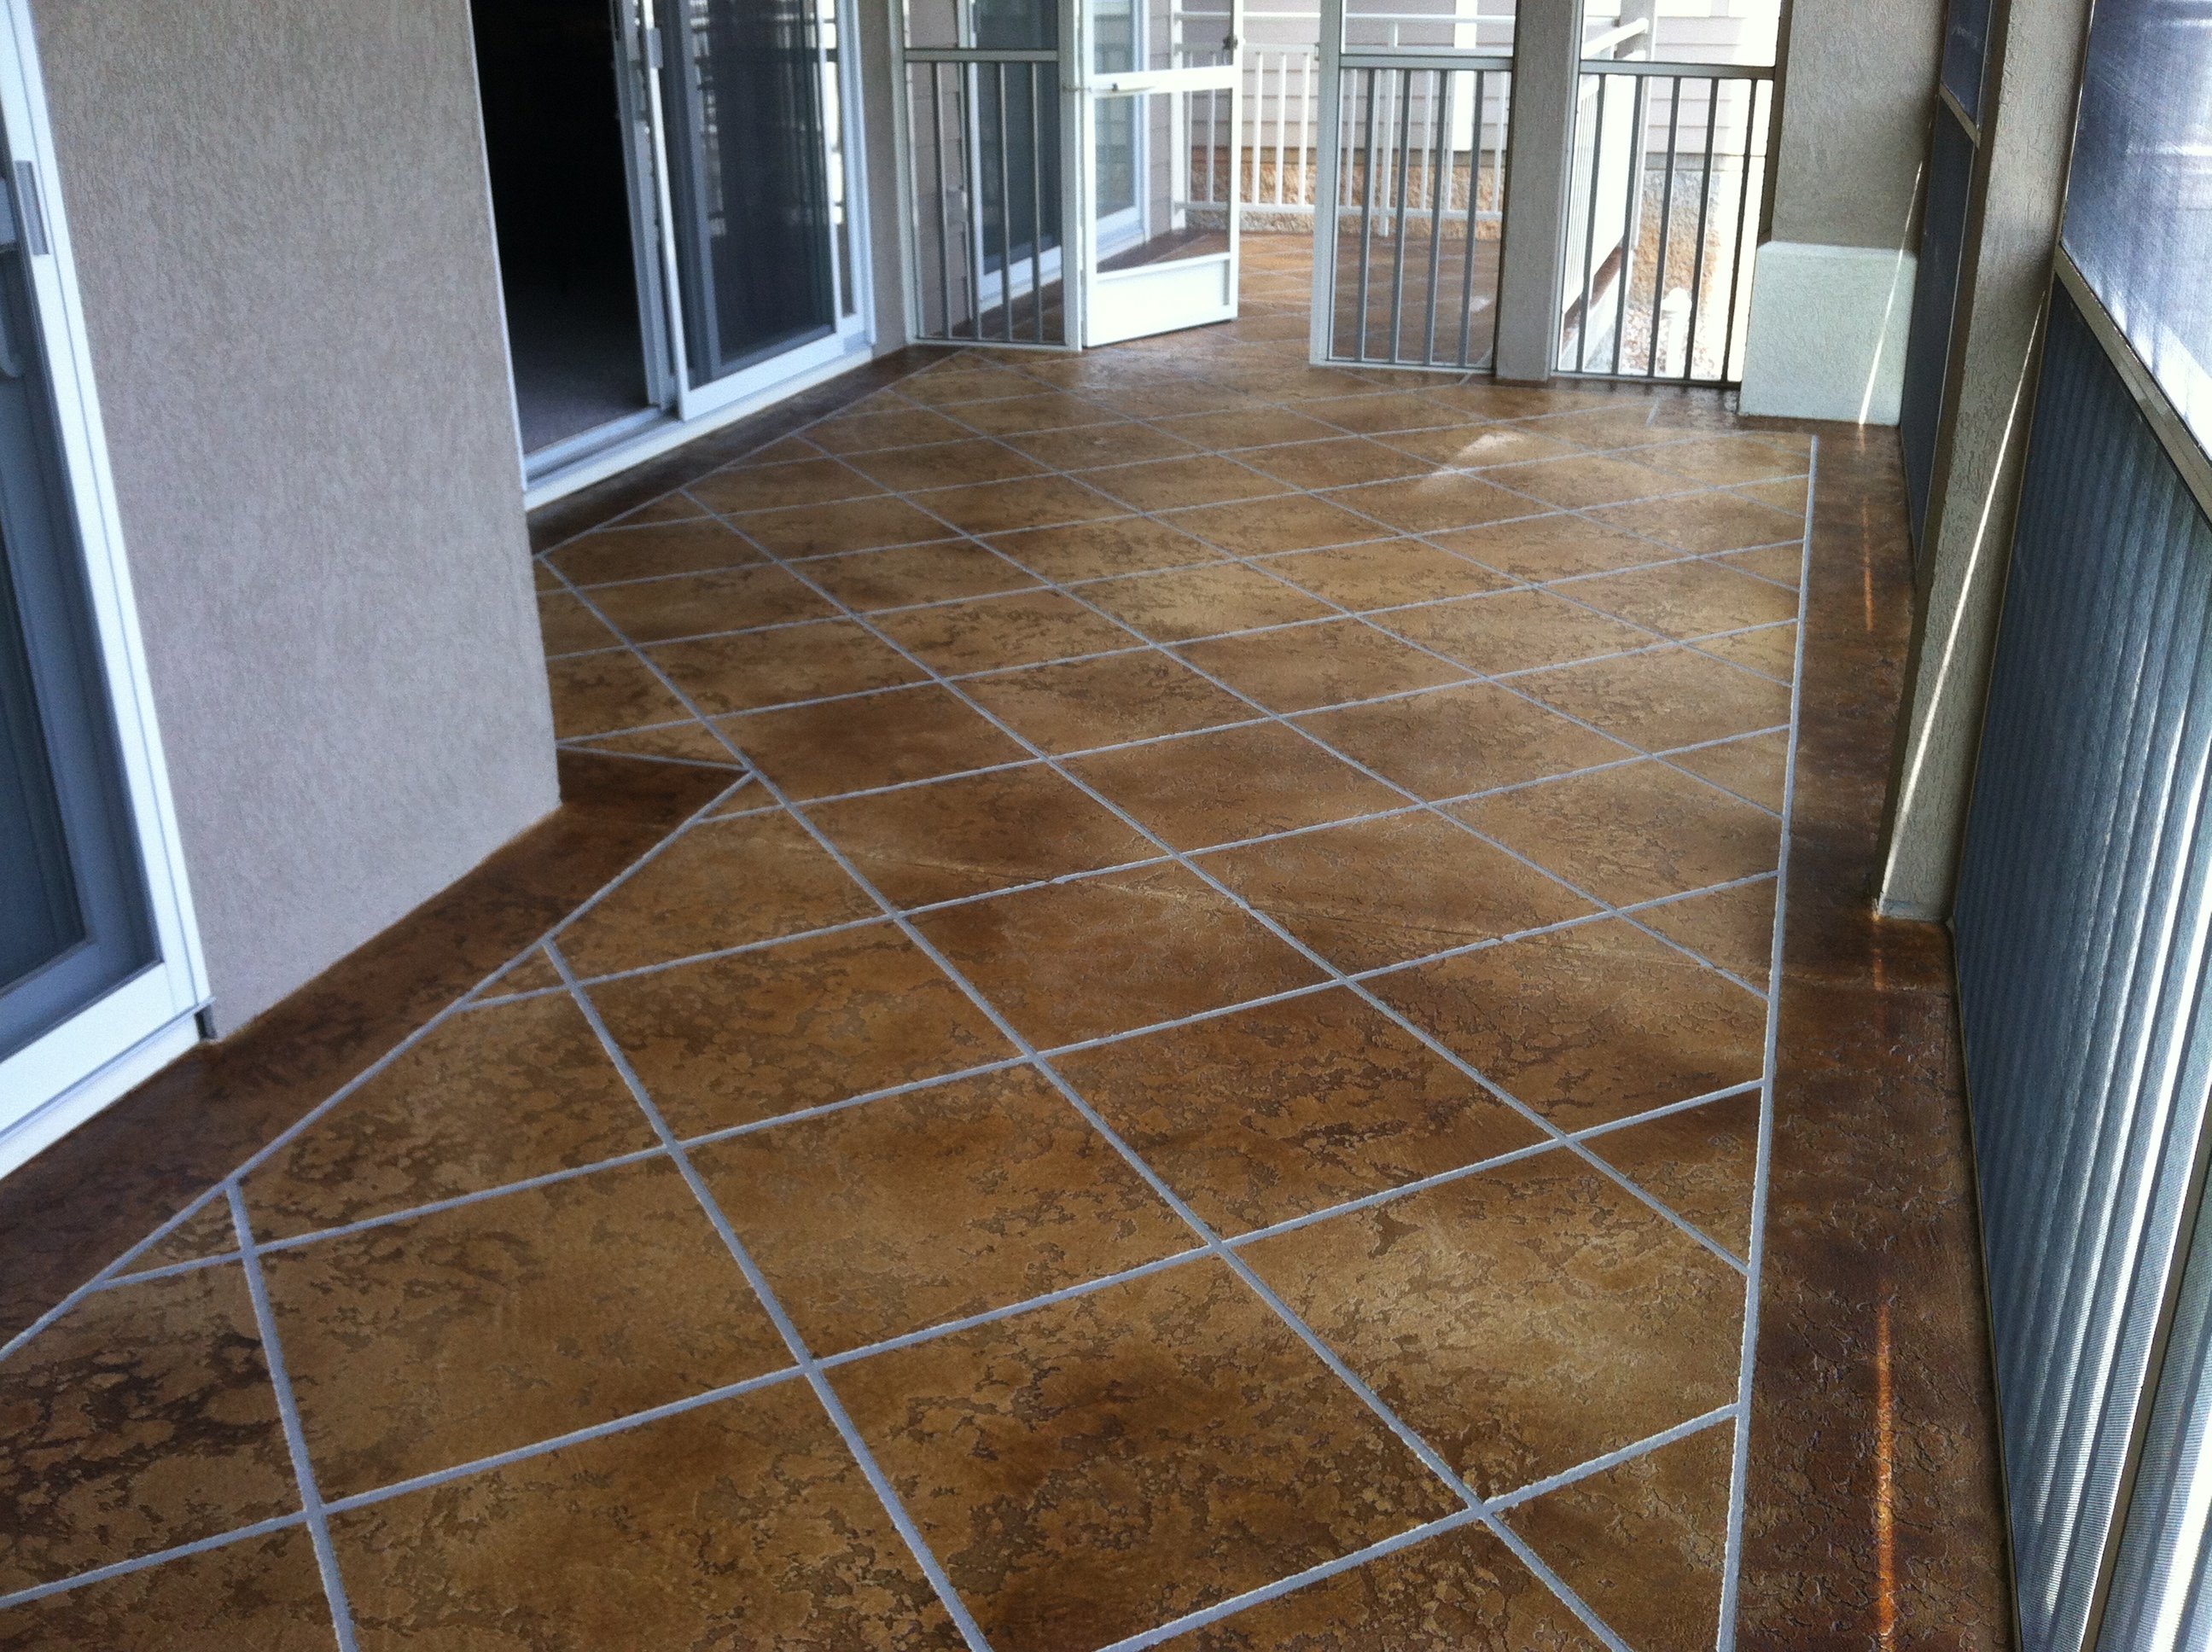
Once the grout coat was established the next day we came back in and taped out our 10inch boarder, then applied our tack coat over the tape with the grout coat to seal the tape and prevent any bleed under. (Blocks the top coat color since its a different color all together).

Now we are ready for a different Color to lay over top of these 3 coats of concrete and the fiber tape that’s now embedded within the last layer of concrete. This coat is a light palomino color which is sort of a light greeish/beige color, but it look good as you can see in the Video above, its the same color as the Texture coat, which is next.

ok now its ready for some texture, we apply the texture all with a trowel, which is very time consuming, this step took all day, well most of it. Ok so now we are ready to mask off the entire deck area, meaning the railing and the condo area, because the next step is Acid Staining the whole deck.IMG_1021

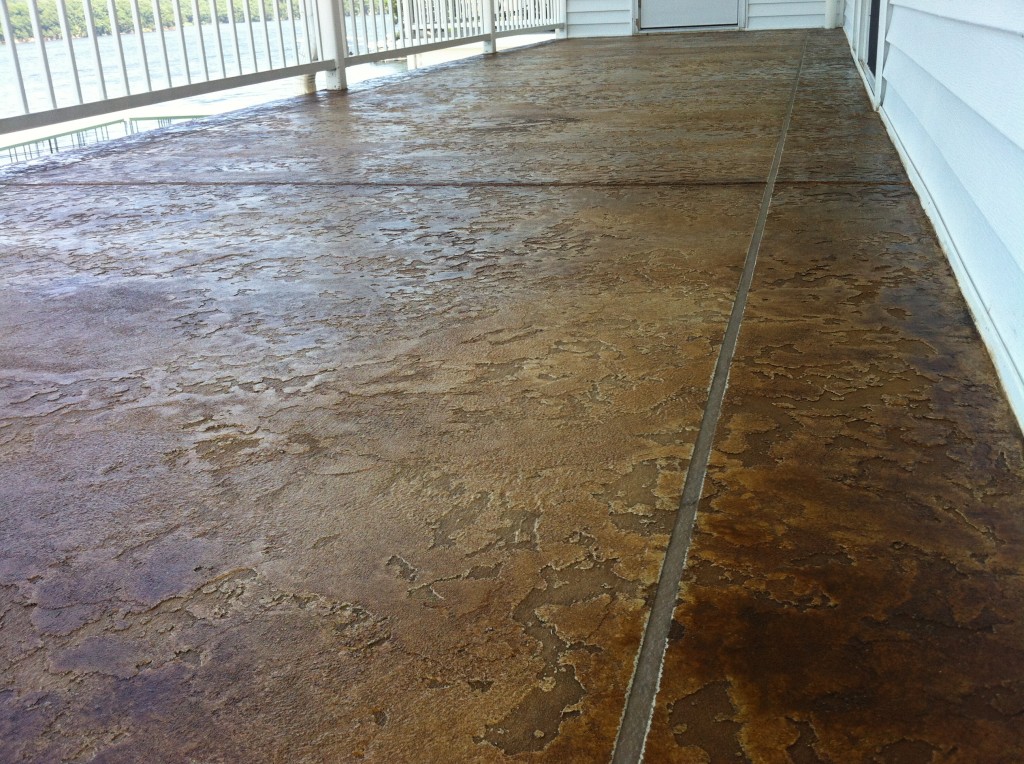
Acid staining, ok here we go… 2 pump up sprayers one with acid stain (brown chem-stone cut 5 to 1) the other is for water to allow the acid stain to disperse evenly, first the water very lightly then spray some acid stain, this technique makes it feather out naturally, and marbleizes very nicely!

I had to wait a few hours for the stain to react to the concrete overly, so I thought well why not hit the gym and kill a few hours, so I did… yes I was feeling a little like Rocky Balboa lol… anyway I came back pulled the fiber tape under my 3 coats of concrete, reveled my grout coat color and my 10 inch boarder came to Life!

Last day was just to come in clean it all up real nice and start mixing the sealer, 1 st coat goes down very quick and the color just pops!!,,,the second coat really pulls it all together, locks it down and now its shining bright like a diamond, very nice gloss!!… This outside deck at Seascape Condo’s in Osage Beach, MO is now saved and will go on to live a very long and happy life!!

Call me for a FREE Estimate.

OR – You can Fill out this Convenient Contact form located HERE and I will Contact YOU!!

Thank you for Visiting my Website, come back again soon….

Rick LaFata
(573)-216-0930
rick@customconcretedesign.info
Custom Concrete Design

image

Epoxy Garage Concrete Floors Lake Ozark Stamped Acid Stained Coating Osage Beach MO Painted Floor

On this Garage Epoxy Floor Project we started by removing the existing flooring of an adhesive backed checker board linoleum, we started out prying and pulling at it but it was so brittle it was breaking off in small pieces, so I pulled out our handy air powered scraping tool, and it pealed it up like a hot knife would cut through butta!!……….more info under the Video.

Once all the tile was up we proceeded to grind the entire floor with our 95% dustless vacuum system this step was all completed within 2 days, we came back in the 3rd day and started mixing our Tan colored Epoxy resin, once the epoxy was all down, we moved to the next step of the process.

The next step was to toss on my spiked shoes quickly and grab my bucket of vinyl chips and get out there on the freshly laid down epoxy and toss my chips in the air (as you may have seen in the Video above).
once all the chips were thrown on top at 100% coverage, I had to take the rest of the day off, and resume the next day.IMG_0742

The last day, we started by scraping and brooming off any lose vinyl chips, clean it up real well. Then proceed to the mixing of the clear epoxy resin, once mixing starts its game on again!!

Once the Clear Epoxy was on, it was clean up time, because this Epoxy Garage Floor Project in Four Season Missouri was Complete!

Call me for a FREE Estimate.

OR – You can Fill out this Convenient Contact form located HERE and I will Contact YOU!!

Thank you for Visiting my Website, come back again soon….

Rick LaFata
(573)-216-0930
rick@customconcretedesign.info
Custom Concrete Design

image

Decorative Concrete Epoxy Garage Floor Coating Lake Ozark MO Porto Cima MO Osage Beach MO

We Started this Residential Home in Porto Cima Sunrise Beach, MO Garage Floor Project with a Pretty Fresh Surface to work with, it had some paint, some oil, but for the most part was pretty nice to work with. We came in and Prepped the floor first by doing some grinding, removing the oil and paint/drywall mud, but once that was done, it was time to prep the walls with concrete tape.


Once we had everything prepped it was time for the Colored Epoxy which was a Med Grey color, once that was laid out I got my spiked shoes on and went out on the nice smooth like glass colored surface and proceeded to toss the chips up to cover the epoxy at a rate of 100%.IMG_0626

Last step was to lay on the clear epoxy to lock the base coats and vinyl chips in place. Pull out tape and clean up!

For More Information Please use the Contact form Located HERE

Thanks for stopping in lets talk soon…

Rick LaFata
(573)-216-0930
rick@customconcretedesign.info
Custom Concrete Design

image

Decorative Concrete Condo Deck Osage Beach MO Acid Stained Faux Tile Flooring Lake Ozark MO

Here We Have a Project at Mystic Bay Condo’s in Osage Beach,  Missouri.

My Blank Canvas of Concrete is Approximately 450sqft, we started by removing the railing, so we could grind some of the rough spots off of the surface, I call them concrete boogers or speed-bumps…lol.

 
The next step was to repair some of the cracks that were noticeable, some were hairline cracks, some needed to be opened up to remove all the lose particles of concrete that were floating around within the crack. Once opened up I mixed up the Epoxy with some silica sand and laid it in the cracks. I came Back the Next day and did some slight grinding over where the cracks were.

Then proceeded with our Decorative Concrete we lay out 2 base coats of Portland Cement with a Charcoal Colorant added in to the mix. This is my Grout Coat color you see.

Next step was to mark out my pattern of a 20×20 tile pattern on a 45 degree pitch, but first needed to establish my boarder of 10 inches all around the perimeter of the slab, once done I began to tape it all out with Strapping Tape.

Next came the Prepping of the walls so they don’t get spayed by the and the Tack Coat which I say in the Video (and Acid Stains), what that means is I simply mixed another bag of concrete with the same portion of colorant in it as the previous base coats, hooked up my compressor and hopper gun and sprayed the concrete on over the Strapping Tape, this is necessary for what we call in the industry as ‘Locking in the Grout Color’ to prevent any ‘BLEED UNDER” the tape from the 2 different colored Top coats and Acid stains going on to our Concrete Overlay in the next steps to come.Decorative Concrete Condo Deck Osage Beach MO Acid Stained Faux Tile Flooring Lake Ozark MO

Next I mixed another bag of our Portland Cement with A color Called Palomino, this was squeegeed this on top of the Charcoal Gray Color (tack coat), once dry I mixed up more of the same color and then added my texturing, I continued to layer my coats with My Trowel until I had the look I wanted.

Next was to mix up the Acid Stains (Chemstone Acid Brown), once mixed I sprayed in a circular motion with a little water at first then the Acid went on over the water, this is to prevent any drops from the sprayer and it makes the acid feather out naturally on its on, this way it marbleizes much better.

Once Dry I pulled the Concrete Strapping Tape up to reveal my Pattern and the 2 Base Coats of Charcoal Grey, cleaned it all up real well, then I mixed up my sealers, and Locked it all down, here is where the coloring  just pops up and says HELLO!!

I hope you Enjoyed the Video, the Pictures and the brief description of the process.

For a FREE Consultation and Estimate, use the Contact Form Located here


Thank You for Visiting my Site

Rick LaFata
(573)-216-0930
rick@customconcretedesign.info
Custom Concrete Design

 
image

Decorative Concrete: Turning Cement Surfaces to Stone

When installing a floor, patio, or driveway, many people would love to have the unique colors and warm textures of Resized Image22natural stone. Slate, tile, brick, and even marble are some of the hottest materials on the market due to their sophisticated look and irreplaceable charm. However, any kind of natural stone comes at a heavy cost. Since they’re rare, difficult to manufacture, and harder to work with, they are never cheap. Therefore many people invest in cement: it’s easy, inexpensive, and effective. But recently homeowners have been able to find the best of both worlds: imitation natural stone. Whether inside or out, decorative concrete offers the look of natural stone without the price tag.

Concrete Stamping
This has become the most common form of decorative concrete today. Since wooden decks and porches are actually becoming a thing of the past, natural stone patios is the newest wave in exterior design. But it costs money. Therefore, stamping allows cement to take on the look of any natural product. During production, certain dyes are mixed into the product to create the right look. Then it’s laid like regular cement. Before it dries, a unique pattern is gently tamped into the wet material. So when it dries, it may look like brick pavers, but without all the work, maintenance, or expense.

Decorative Concrete Resurfacing
Cement eventually gets beat up by the weather, the cold, or simply by the years gone by. When it ages, you’re bound to see fading or cracks, so instead of breaking up the old and completely replacing it with the new, many homeowners choose to resurface. By applying a thin layer of fresh cement over the pre-existing product, many of the flaws can be sealed and covered. However, if you’re tired of the pitted, gray look of cement, think about decorative concrete resurfacing. While the holes and cracks are being repaired and covered, color can be added, along with engraved patterns and brushed textures, in order to imitate the breathtaking look of natural stone.

Decorative Concrete Coating
If you have a pre-existing cement structure, you can still brighten it up. Whether it is your interior flooring, countertops, or exterior walkways, decorative concrete coating has become quite popular since it doesn’t require new construction. Here are a few different options available to you:
Stain: An acid stain is applied over the top of an existing surface, wherein a chemical reaction occurs between the two substances and afterwards a permanent color stain appears. The real usefulness of this technique is the custom design. You can create swirls to replicate granite. You can design patterns to match the look of marble floors. It can even imitate wood and leather, giving you limitless options.
Dyes: Simply another form of color staining, many contractors can literally paint the floors with a special spray-top dye.
Texture: Not only can you spray on colors, you can spray on the texture you want as well. In the past, one could only apply designer texture during decorative concrete resurfacing (broom finishing the surface while it’s still wet), but now you can simply spray on the desired surface in order to gain the grain you want.

More Decorative Concrete
Of course it doesn’t end there. Though the methods mentioned above are the more popular techniques, there are also stenciling, polishing, color flaking, epoxies, and many more options, some using a combination of these processes. But the main attraction is that decorative concrete is not only a fiscally wise alternative, it’s also limitless in terms of design choices, application, and location (don’t forget your garage floors, basement floors, pool decks, and stair steps).

Call Me for a FREE Estimate!!

Rick LaFata
(573)-216-0930
rick@customconcretedesign.info
Custom Concrete Design

image


 Page 7 of 12  « First  ... « 5  6  7  8  9 » ...  Last »