google.com, pub-1613111081024165, DIRECT, f08c47fec0942fa0

Stamped Concrete Archives

Decorative Concrete Tuscan Slate Antiqued Charcoal Grey Linn Creek | Lake Ozark MO

We had some great concrete to work with on this particular project, the home was only about three years old and the concrete was in almost perfect condition there was one large crack that ran from one side of the slab to the other side on the lower outside patio/deck other than that the concrete was awesome to work with and so were the people!

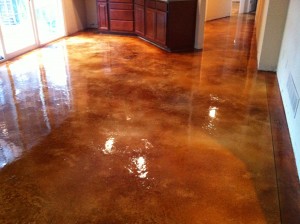
The total square footage on this project was approximately 500sqft, the finish is Tuscan slate the coloring is a charcoal antique stain.IMAG1845

The prep work consisted of grinding out the loose material in the crack on the back patio deck, once we had it opened and cleaned we poured our material inside of the crack overflowing it letting it cure and grinding it down flush. There was some grinding here and there on the slab the walkway and the front stoop but it was very minimal, our next step was to mix up the muriatic acid and ammonia in separate buckets then put on our muriatic acid first followed by our ammonia and water mix once this was thoroughly scrubbed in we hooked up a pressure washer and pressure washed everything clean.

Once the prep work was out-of-the-way, we set up our workstation and proceeded to mix our first bucket of concrete, next step we applied our base coat of colored concrete, once the base coat was applied on all surfaces we continued to mix our concrete only a little bit lighter for the texture coat which is our Tuscan slate, once the first surface was dry we continued to apply our texture coat on top of the base coat on all surfaces.

The next day we came back prepped all the walls with paper or anything we didn’t want the antique stain to color, from there I mixed up enough antique stain to do the entire job once mixed we sprayed it down, sometimes you don’t always get it right the first time so we had to spray a second coat on (to darken more) until I got the look that I wanted once that was on all we could do was let it dry, we came back the next day and we put two coats of our premium CSS sealer on it.

Wrapped up a pretty simple job, but it turned out great… The homeowners were happy and so was I.

Hope you Enjoy the pictures and Video
MORE pictures located HERE!!

Call me for a FREE Estimate.

OR – You can Fill out this Convenient Contact form located HERE and I will Contact YOU!!

Thank you for Visiting my Website, come back again soon….

Rick LaFata
(573)-216-0930
rick@customconcretedesign.info
Custom Concrete Design


What Affects Cost of Decorative Concrete Floors??

I get Asked this Question more than any, can you ballpark a cost….understandable, but there are a number of factors that can substantially increase or reduce the installation cost of a decorative concrete floor. Some you can control, such as the complexity of the project, and others you can’t, such as the floor size and existing condition. Here are the issues that can have the biggest impact on what you’ll pay:

10277711_631674570276534_7726476077663520749_n

Size of the Floor – Typically, the larger the floor area, the lower the cost per square foot for installation due to the economies of scale. A small residential floor project, for example, is likely to cost more per square foot than a large 50,000-square-foot commercial floor.

Material Requirements – Using multiple colors of stain or dye on your floor or a specialty epoxy or metallic coating will not only increase your material costs, but also the labor costs for installation.

Design Complexity – The more complex your project, the greater the costs for both materials and labor. Customizations such as embedded objects, decorative sawcuts, stenciled designs, and the installation of metal divider strips may increase the total floor cost substantially. (But the results will look amazing!)

Current Condition of the Floor – Existing concrete floors that require a lot of patching or surface preparation will boost your total installation cost because these flaws will need to be repaired before the final decorative finish can be applied. Extensive surface preparation, such as grinding, crack repair, and spall repair, can add as much as $2 per square foot to the overall cost of the floor. If a full resurfacing is needed, expect to tack on another $2 to $3 per square foot (for a $4 to $5 per square foot increase).

Floors on Grade vs. Above-Grade InstallationsDecorative concrete floors installed on raised decks or subfloors will need a cement underlayment installed before the finished floor can be applied. Typically installers put down a series of products including waterproofing, metal lathe, a concrete overlay and then the final finishing and sealing coats. These applications can add another $2 to $3 per square foot to the cost of the floor.

Moisture-Vapor Transmission – Some floors have a high level of moisture-vapor transmission that will need to be remedied before most decorative coatings, overlays or sealers can be applied. This is usually not an issue with stained or polished concrete floors, although it can affect the color.

Hope you Enjoy the pictures and Video
MORE pictures located HERE!!

Call me for a FREE Estimate.

OR – You can Fill out this Convenient Contact form located HERE and I will Contact YOU!!

Thank you for Visiting my Website, come back again soon….

Rick LaFata
(573)-216-0930
rick@customconcretedesign.info
Custom Concrete Design

Facebook YouTube Twitter pinterest WordPress Flickr about.me Instagram

#1 Most Viewed Contractor On…. CLICK THE LINK!!

The Title Says it all currently we are the most viewed and talked about profile on Decorative Concrete Kingdom, click the Blue Highlighted words THAT READ–>> HINT–>> 😉 Decorative Concrete Kingdom and find out why we are getting so much traffic to our Profile page. Stay tuned updates are comin up soon!!!

??????????????????????????????????????

Decorative Concrete Resurfaced Back Patio Spray Texture in Lake of the Ozarks MO

Today we are on a job in Lake of the Ozarks off Highway W, we started our usual prep procedures on this project, the first thing we had to do was start grinding the surface and open up the cracks to repair we had to remove paint, and oils from the surface.

We also had to level up some low spots up next to the house they ran the full backside length of the patio once these spots were leveled up we ground everything flush, mixed up the muriatic acid, ammonia with water… Sprayed on muriatic acid and then neutralized it with ammonia water once this procedure was done we pressure washed it and mixed up our first bucket of concrete which is our base coat.Decorative Concrete Resurfaced Spray Texture

We laid out the base coat which is a lighter gray, once that was dry we had to put a second base coat on same color once dry we taped out our brick boarder, then rolled out our stencil and cut that stencil to fit the patio. Once the stencil was laid out and cut then placed next to our brick boarder we were ready to start mixing up our topcoat which is our brick red color fire up the compressor hook up the Hopper gun filled the Hopper and start spraying which you can see in the video below, once we had it sprayed out the whole patio was red and you could see our herringbone pattern.

Now we have our topcoat redbrick color sprayed on I wanted to highlight the entire project with a white and a black highlight coats so we mixed up our white coat sprayed small specs which is our highlight coat on the entire surface and then repeated the same procedure with our black highlight coat.

So we have our prep work done the base coats on, our stencil laid out and cut to fit the patio our topcoat on, highlight coats done, we are ready to pull our stencil, pull our brick tape around the perimeter to reveal our pattern and our base coat below.

Next step was to mix up our antique stain we used the darker brick color and a very dark charcoal color and went through the entire pattern coloring random bricks charcoal and the darker brick red. Once I had an even, but random look it was time to mix up our sealer and add 2 coats of our premium outside sealer to lock this job down.

I believe our customer was quite surprised at the complete makeover that this patio went through going from a plain field of gray concrete broom finish texture to having an entirely brick laid look and custom patio.

Another Concrete Surface Saved and Beautified by Custom Concrete Design!

Hope you Enjoy the pictures and Video
MORE pictures located HERE!!

Call me for a FREE Estimate.

OR – You can Fill out this Convenient Contact form located HERE and I will Contact YOU!!

Thank you for Visiting my Website, come back again soon….

Rick LaFata
(573)-216-0930
rick@customconcretedesign.info
Custom Concrete Design

Facebook YouTube Twitter pinterest WordPress Flickr about.me Instagram


Decorative Concrete Antique Acid Stained Condo Deck Lake Ozark, MO

This week we were down Horseshoe Bend in Lake of the Ozark, MO… This project was pretty simple once we got past the Epoxy that was put on the outside suspended deck, it was on there pretty good…. the grinders we used did a great Job as usual, but so did the muscle behind the grinder, we always win so this deck coating really had no chance haha

Grinding the Epoxy off we did start to see more and more cracks appear, these cracks were not repaired before the epoxy went on so most of the cracks never showed up until the Epoxy was coming off, looks like the material just filled in the area’s where cracks were present, so now the coating is off we had to open up the cracks some to remove loose material so we could fill it with our crack repair material… Awesome stuff works GREAT!!IMAG1991

Cracks are repaired now it was time to start the overlay, we laid out our base coat of charcoal colorant, it looked great, the next day we came back and started taping the pattern, on this one we hand taped a Ashler slate type pattern, once we got the look we wanted we had to prep up the walls and railing from any over spray of concrete material, next was what we call the tack coat…its a layer that goes over the fiber tape to help keep the top coat from bleeding under the fiber tape, we do NOT want that to happen. ok Tack coat is sprayed on… time to go home for the day.

The next day we came in and started out texture coat which IS the most popular of texture coats that we do “THE TUSCAN SLATE” so we get that coat on once dry we pull the tape and clean it up… looks great!

Next step was to make sure everything is still taped up well from over spray but this time it was not going to be over spray from Concrete, now its time for the Antique Acid Stain, once I mixed it up checked to make sure everything was covered I started spraying it on with my pump up sprayer, we had to do a few coats till I got the look I was after… done let it sit and do its thing.

Looks great so now we need to pick out random squares to hand paint with sponge brushes two different colors one Slate grey Antique Acid (slight blueish tint) and a grey that was pretty standard just a medium grey… a lot of this is shown in the Video at the bottom of this page or click the Red Video Tab at the Top to watch it. So now we have all the squares colored that we want, again this was just random no real pattern, just wanted it to look kinda proportioned.

Ready for SEALER!!… we mixed up our premium sealer and laid down 2 coats with a roller, pretty simple the only thing left was to shoot the final Video and take some pictures and this Job was DONE!!

Another Concrete Surface Saved and Beautified by Custom Concrete Design!

Hope you Enjoy the pictures and Video

MORE pictures located HERE!!

Call me for a FREE Estimate.

OR – You can Fill out this Convenient Contact form located HERE and I will Contact YOU!!

Thank you for Visiting my Website, come back again soon….

Rick LaFata
(573)-216-0930
rick@customconcretedesign.info
Custom Concrete Design

Facebook YouTube Twitter pinterest WordPress Flickr about.me Instagram

 Page 4 of 6  « First  ... « 2  3  4  5  6 »