Concrete WOOD Resurfacing 👷 Step by Step 👷 WATCH as we CREATE Decorative CONCRETE Wood
This week we’re down horseshoe bend in Lake of the Ozarks here we have a walkway that leads over here to the garage, and over to the front stoop. I need to take this overlay off it’s broke up pretty good, and pretty damaged, it almost looks like they put it over a slab of rock or somethin, and it could be a couple of coatings, It’s got a lot of cracks and damage to the to the slab it’s in pretty bad shape, so with that said I decided to take my hammer and chip that off, it appears to be hollow up underneath there in that particular area.
There’s a few cracks and some water where they water their plants. So if that water’s gotten up underneath it there, there’s probably A good chance that a lot of this underneath here is very lose and hollow, so i’m gonna go ahead and start grinding this off and see what we’ve got up underneath.
Okay, we’re, going to pick up where we left off on this job. They’ve got this slab repoured and it’s ready for an overlay now. So I’m grinding the rest of it off over here as you can see where I stopped. I cut that line across here and they redid this area of their concrete, now i’ve got to come in here and grind the rest of this concrete overlay off that was on here which you can see i’ve already started that.
What the white is i’m. Taking that down to the original concrete i’ve got to bring it down there’s about a half inch lip that i’ve got to go ahead and and get you know, get down flush, maybe a half inch Or so, and we’ll, probably slope it back about a foot and a half, so it’s, got a nice slope to it, yeah other than that.

This is what we’ve got to start with. Today we’re gonna, hopefully get everything ground down today and come in and do our first base coat tomorrow. The finished look is gonna, be a wood plank oh luke! I am your father.
Okay, it’s day. Two on this concrete wood project down horseshoe bend and lake of the ozarks. This is rick uh. We just got the base coat on finished. The grinding put the base coat on. It looks kind of spotty right now because it’s drying up uh.
It’s, getting kind of warm out here and you know wind’s blowing pretty good, but this is a base coat. It’s. Actually going to be darker than this, but i didn’t want to go in with a white base coat, so i added some color to it, but you can see how much it is uh drying right there and that’s, where I started it gets a little bit more solid here.
I’m, probably going to wind up going with a second coat and it’ll be darker and you can see where it’s more and more solid. As far as a darker color goes because here’s, where i stopped, but i’ll actually do a shade, or maybe three shades darker than that.
I want it to be pretty dark um, because when we put our wood pattern down and pull our tape, this is the grout coat that you’re gonna see that’s. That’s, the color, but you know it’s, going to be almost black uh real dark.
You know charcoal so um. It always lightens up several shades when it is drying, but it always goes back to a darker color. So here’s, where we’re at right now on stage, um got several steps to go, but we should be done with this next wednesday or thursday and right now.
I believe this is may 2nd wednesday, so anyways that’s. What we got for now, all right. We got our second base coat on a little bit darker this time. So this is the color that you’re, going to see, probably actually even darker than this, once we put stain on it seal it.
You know, of course, that after the wood texture goes on it, but this is uh a little bit truer to the color, so it just went down still a little wet. It will dry light, but it ‘ Ll go back to this color when it’s done, but it’s.
Uh. It’s, a lot more solid, now um starting to dry up here and there. So there might be. I don’t know if it’s shadows or it’s, just drying up in certain areas, but there you go second base coat is down okay.
We now have the fiber tape over our two base: coats. All the wood planks have been measured out. Everything’s, hand, taped four, six and eight in the width. The length is just kind of random. I really don’t want a pattern:- i’ll, be in monday spray over the top of this, with the grout coat color.
That way, we lock that tape down and get it sealed off. Because tuesday, we’re, going to be doing the texture wednesday. We’re, going to be staining and thursday. We’re, going to lock this thing down seal.
It up and get home. Okay, we’ve got our tack coat on. You can still see the tape ghosting through the tack coat of concrete because it’s, just a thin layer, We’ll, come back in tomorrow morning with the texture coat, so it almost doesn’t.
Look like the uh. Almost doesn’t. Look like there’s anything over because you can still see that tape quite a bit, but tomorrow you will not see this tape. I’ll bury it tomorrow and then i’ll, pull it up probably tomorrow afternoon, and then we’ll stain it wednesday.
Okay, we have the wood texture coat on here uh. We just do this coat in a white because uh tomorrow we’ll, come in and pull the tape. The pattern tape that’s underneath of it and um. You know, then, you’ll, be able to see the texture a lot better and, of course, the pattern once the tape’s pulled, but we do it white, because we’re, going to color it with a couple of Different colors tomorrow so that way we just got a clean slate to begin with. It just works better if it’s done on a white base and i don’t know. If you can see this very well or not a lot of shadowing here, but it’s really hard to tell what the texture looks like.
Let me get a little closer. It’s kind of so bright out here that it’s kind of bleeping everything out. Let’s. Try here, all right, so that’s. What we have for now? Okay, it’s, cleaned up and ready for some color.
All the tape’s been pulled. It’s, been cleaned up, joint lines, open back up it’s, been edged up against the driveway. Everything’s, nice and clean there. All the nail holes have been drilled, so every plank has two nail holes on each side of it: four per line that’s where the planks meet and they are staggered, um uneven on purpose.
We want this to look as authentic as possible. Perfect imperfection, if that makes sense, so i’m, getting ready to come in and just hit those nail holes with some darker color to make them completely black.
And then we’Ll start the coloring, which is going to be brown and amber, okay. This is before the sealer goes on, but the color is all done, cleaned up it’s, ready to go actually started sealing it up top, but i stopped to take this video real quick.
This is how the color turned out again. This is before the sealer i’ll. Do a final after the sealer’s on! Let me know: does that look like wood about as close as i pretty much can get it there’s.
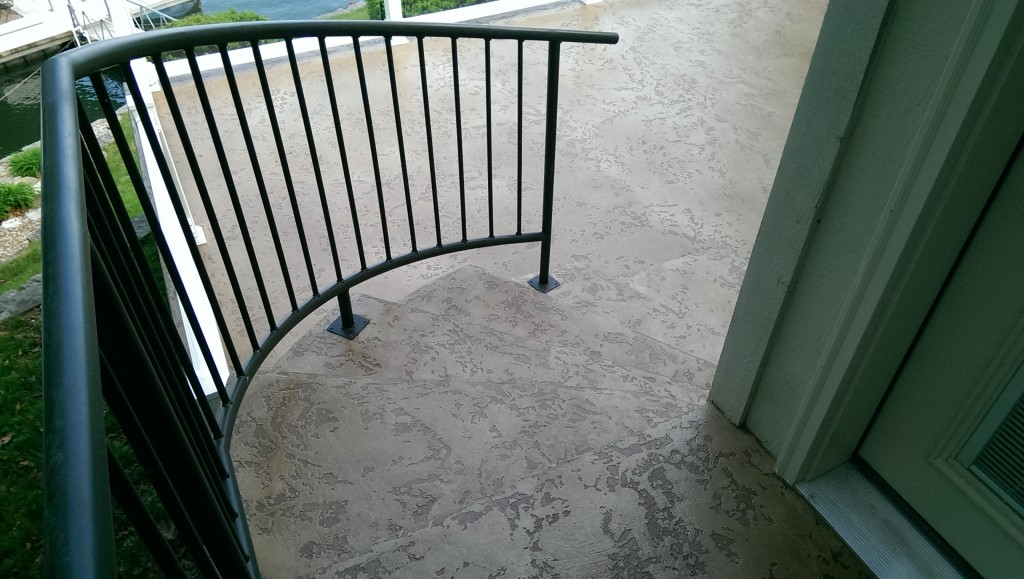
Different, looks different colors a little bit different patterns that you could do with it. But overall i think mission accomplished. Okay, this job in four seasons is complete.

I think wood is done. got some nice texturing real nice coloring just goes uh perfect, with the setting they’ve got here. Now they have the house decorated,. You know the big wood beam pillars and the front door, all rock it’s, just a real rustic look.
So let’s, just kind of finished it off. This is going to run all the way over here to the front stoop, i mean sorry, i didn’t want to do anything with that drain other than just do a picture frame around it.
I didn’t want to drop any lines in it because it’s. Such a small area can’t, keep our wood look for the most part on the side wall from the twin stoop area. That will look really weird, i think, with a bunch of lines running through it, especially with that grate.
We just got some really nice, texturing and coloring here see if i can get a little closer, so you guys can see it. We have to keep the joint lines open so that’s. What that is, you can’t fill those in because the concrete wants to expand in the winter months well, winter and summer, so that concrete has to move.
So we got ta leave those expansion, joints open, yeah, sun kind of gives you a little bit different perspective. It does bring out the color, but it also kind of makes it look a little bit different than what it really is too.
That’s. Why it looks so different over here, more it’s covered up in the shade versus out there right in that bright song, so the rest of it does look like this. It’s, just the sun just kind of blends it together.
More, let’s. Look at this texture, since we’re in the shade here and the coloring, also drilled in every plank. There’s, okay, that’s about it. For this one, you guys are watching this on youtube.
Please subscribe to My YouTube Channel and uh like the video. If you like it, leave me a comment. Let me know what you think and hit that little bell, so you stay subscribed to my videos. Uh links are below to my facebook page and my website, where you can get more information.
All right see you guys on the next one.
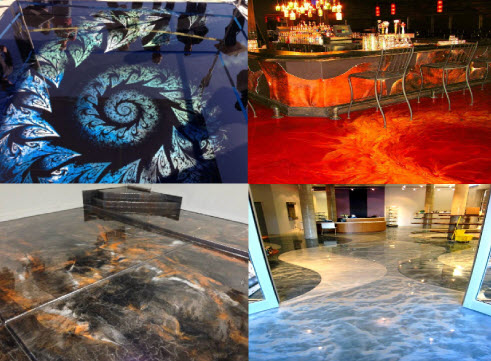
Hope you Enjoy the pictures and Video
MORE pictures located HERE!!
Call me for a FREE Estimate.
OR – You can Fill out this Convenient Contact form located HERE and I will Contact YOU!!
Thank you for Visiting My Website, come back again soon….
Rick LaFata
(573)-216-0930
rick@customconcretedesign.info
Custom Concrete Design
![]()
![]()
![]()
![]()
![]()
![]()
![]()
![]()